Problems:
CS100 Homework 6 (Spring 2023)
(April 15 20:30) Problem 2 added. Go to Piazza to download attached files.
(April 15 22:22) Problem 2: Testcase 6 of Subtask 2 has been fixed. Move assignment in the test code has been changed to copy assignment. The point allocation of three subtasks has been changed to 5:5:90.
(April 18 17:40) Problem 3 added. Go to Piazza to download attached files.
Unit Test: Class Basics and Copy Control
This problem is to answer questions.
👉 Go to GitHub for the HTML page file
Dynamic Array 2.0
This problem is based on the Dynarray you wrote in Homework 5 Problem 3. Before adding anything new to it, your Dynarray should meet all the requirements in that problem first.
In this task, your Dynarray should support the following new things.
1. Type alias members
The standard library containers have many type alias members for the purpose of supporting generic types. For example, std::vector<T>::value_type is T, std::vector<T>::size_type is std::size_t, std::vector<T>::pointer is T *.
As an exercise, do the same thing in your Dynarray. You need to define the following type alias members:
| type alias member | definition |
|---|---|
Dynarray::size_type |
std::size_t |
Dynarray::value_type |
int |
Dynarray::pointer |
int * |
Dynarray::reference |
int & |
Dynarray::const_pointer |
const int * |
Dynarray::const_reference |
const int & |
All of them should be public.
Moreover, we will eventually make this Dynarray a class template Dynarray<T> that can store any types of data, not only ints. This will be in Homework 7 or 8, depending on the lecture schedule. To make your work easier by then, you'd better make full use of the type alias members you have defined. For example, change new int[n] to new value_type[n], change int & to reference, and change (const int *begin, const int *end) to (const_pointer begin, const_pointer end), etc. By the time we make this a class template, you will just have to modify very few things.
2. Move operations
Add a move constructor and a move assignment operator for your Dynarray. The move operations of Dynarray have the semantics of transferring the ownership of the data. For example, suppose a is a Dynarray, and the move-initialization of b
1 | Dynarray b(std::move(a)); |
makes the ownership of a's data transferred to b. After that, a should be an empty dynamic array that can be safely destroyed or assigned to. The move assignment operator has similar semantics.
Both the move constructor and the move assignment operator should be noexcept, and they should not involve any operations that might throw exceptions (e.g. new/new[] expressions).
3. Find
Let a be a Dynarray and x be an int. a.find(x) should return the position (index) where x first appears. For example:
1 | int arr[] = {42, 43, 45, 43, 45, 47, 42}; |
If x is not found, return Dynarray::npos, which should be of type const std::size_t and has the value equal to static_cast<std::size_t>(-1).
Moreover, one can also specify where to start searching by passing the second argument pos of type std::size_t. For example:
1 | assert(a.find(43, 2) == 3); |
a.find(x) is equivalent to a.find(x, 0). If x is not found in the index range [pos, size()), or if pos >= size(), Dynarray::npos should be returned.
Notes:
- The return type of
findshould bestd::size_t. - C++ allows functions to have default arguments.
conststatic members can have an in-class initializer.
Submission
We have provided you with three files: dynarray.hpp, example.cpp and compile_test.cpp. You can run example.cpp and compile_test.cpp on your own. Submit the content of dynarray.hpp to OJ.
Grading
The grading of this problem contains three subtasks.
The first subtask contains only compile-time checks. This subtask accounts for 5 points.
The second subtask contains the tests from Homework 5 Problem 3, which accounts for 5 points.
The third subtask contains the new tests for the requirements in this problem, which accounts for 90 points.
If subtask 2 is not passed, the testcases for subtask 3 will not be run.
Attachments
Game Of Life
Welcome to the world of the Game of Life!
In this assignment, you will build your own games in C++ using our framework. This will be a challenging but rewarding experience.
Have fun!
Background
The Game of Life is a simple but profound game, created by one of the world greatest mathematician John Horton Conway. This game does not require player participation because all evolutionary processes are determined by the initial state and will proceed spontaneously. A common way to play with the Game of Life is to give it an initial state and watch how it evolves.

Rules
The universe of the Game of Life can be simply considered as an infinite sheet of grid paper, in which each grid (or cell) is either alive or dead. The original rules for the Game of Life are reprinted below:
-
Underpopulation: Any living cell with fewer than two living neighbors (the surrounding 8 cells) dies.
-
Survive: Any living cell with two or three living neighbors lives on to the next generation.
-
Overpopulation: Any living cell with more than three living neighbors dies.
-
Reborn: Any dead cell with exactly 3 living neighbors comes to life.

There are many variants of the Game of Life , each with its own rules. Here are four of the most popular variants:
-
Colorised
It follows the basic rules as described above with one addition: the living cells have different colors. When a cell is born, its color will be decided by the major color of its three living neighbors.
The formal definition will be described later. More on wiki.
-
Extended
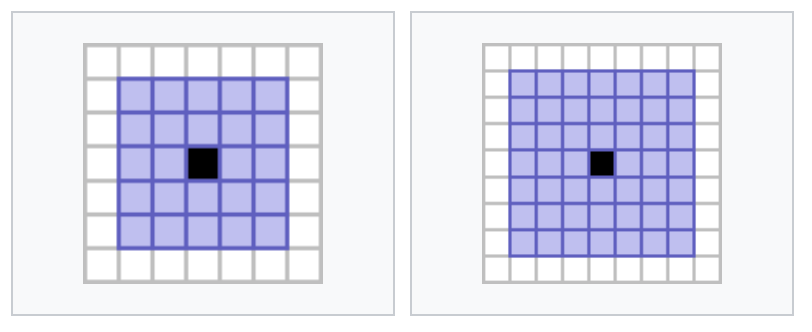
It follows the basic rules as described above with one change: the size of a cell's neighborhood is extended. Consider any square with size , the centering cell will have all other cells in this square as its neighbors. For example, extended to a 5 * 5 square, (i.e all 24 cells around a cell are now its neighbors, but the cell itself is not included in its neighborhood).

The formal definition will be described later. More on wiki.
-
Weighted
It follows the extended rules as described above with one addition: the neighbors are weighted, meaning that some neighbors might have more influence on the centering cell. More on wiki
-
Generations:
It follows the basic rules as described above with one change: the living cells will not die immediately when overpopulation or underpopulation happens. Instead, the cells 'get older' before the final death.
The formal definition will be described later. More on wiki.
Try it Out!
The Game of Life has been studied extensively, and many interesting patterns have been discovered. Before starting your work, we strongly recommend you to first try this game out! You can play with it at golly, and there are many amazing patterns you can find online. Here is a video in YouTube and BiliBili about the Game of Life for your reference.
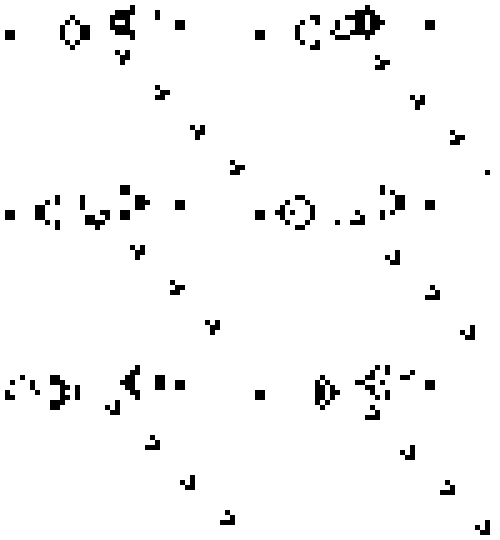
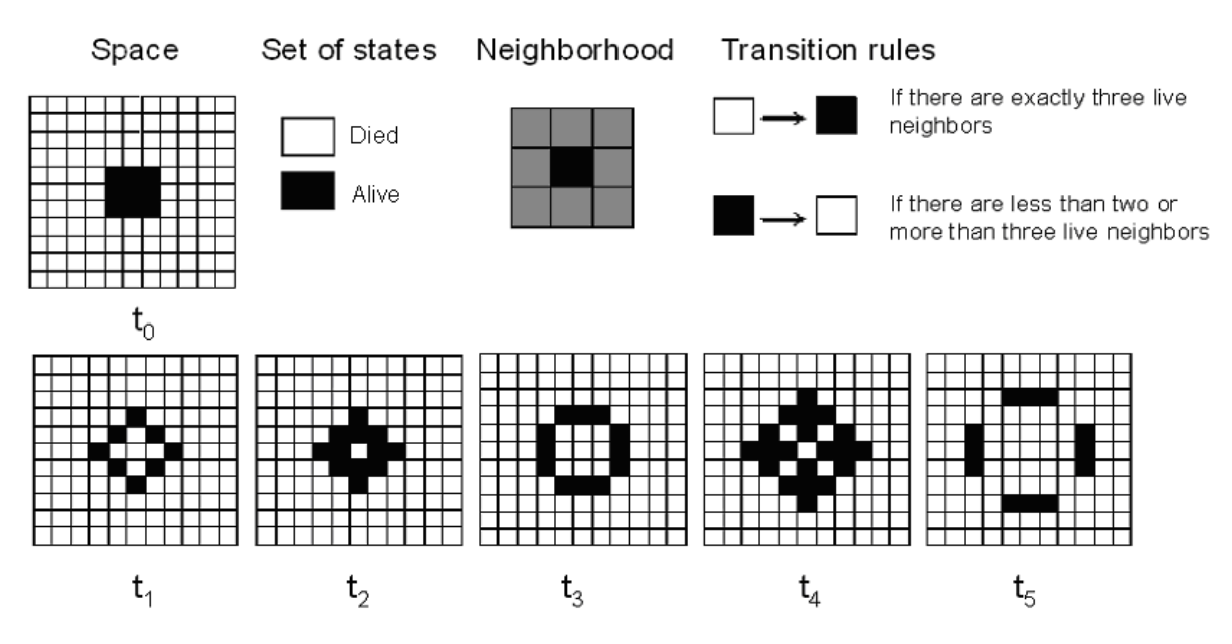
You will notice that some of the patterns are stable, meaning that they will continue to exist indefinitely, and some of them are even periodic, meaning that they will repeat themselves after a certain number of steps. Other patterns are unstable, meaning that they will eventually die out. Here are some basic patterns:


Your Task
The Game of Life is a very simple game, but it has been shown to be capable of producing complex and interesting patterns. In fact, there are entire websites and books dedicated to the study of the Game of Life.
Your task is to complete the implementation of our C++ version of the Game of Life with multiple rules. We have provided you a framework to help you get started. You need to design the variant game rules in LifeRule.h and LifeRule.cpp. You can refer to How-to-Run to play with the game.
Different rules are represented by different classes that inherit on the common base rule class LifeRuleBase. You need to think about how to design these class structures, and the inheritance relationship between different rules.
We have already provided the base rule, class LifeRuleBase. Left you to finish are four variant rules listed above: LifeRuleColorised, LifeRuleExtended, LifeRuleWeighted, and LifeRuleGenerations.
Here is the description:
LifeRuleBase: We have provided it for you. This is the original Game of Life, containing the basic code for implementing a rule in the Game of Life.LifeRuleColorised: You need to complete it. In this variant, the live cells have different colors.LifeRuleExtended: You need to complete it. In this variant, the size of a cell's neighborhood is extended.LifeRuleWeighted: You need to complete it. In this variant, neighbors are weighted.LifeRuleGenerations: You need to complete it. In this variant, the cells "get older" before eventually dying.
To make sure the homework compiles, every rule must be a subclass of LifeRuleBase.
You will be working only on two files, LifeRule.h and LifeRule.cpp. Other files are not submitted.
Framework
In real life, the game is often played on infinite number of grids. However, to simplify this homework, our game has fixed 25 * 25 grids. The cells out of the grids will always be regarded as dead, and will never come to life.
For the original rules, a cell in grid can be described by three parameters: x, y and state:
- represents the coordinate of this cell.
- State describes whether the cell is alive or dead.
A cell is defined in LifeCell.cpp, called class LifeCell, with a smart pointer CellPointer.
A class of any rules have two key functions DetermineNextState, GetNeighbors. You may want to reuse some of them, and rewrite others.
Here is the definition of the two functions:
DetermineNextState
This function will determine the next state of a cell, based on its current state and the number of lived
neighbors.
- Parameters:
current: ACellPointer, pointing to a cell to be updated
neighbors: anstd::vectorofCellPointer, containing all the neighbors of the cell we working on. You need to count the number of living cells in neighbors to determine the next state.
GetNeighbors
It returns a vector containing all of the neighbors of the cell at .
- Parameters:
game_world: The current world we are working in (You can imagine this as the grid paper we play the game on).
x,y: The coordinate of the cell.
- Returns:
All neighbors of a cell at .
Rules Implementation Guide
Colorised Rule
The colorised rule is a variant of the original game. Now the living cells are all colored with one of the two different colors, red and blue. When a cell is born, its color will be decided by the majority color of its three lived neighbors.
Since the birth of a cell only happens when it has 3 living neighbors, and we only have 2 colors here, a majority color is guaranteed.
- Please note that it should be implemented as
class LifeRuleColorised.Hint
- You may want to inherit
LifeRuleBaseand override itsDetermineNextState.
Extended Rule
The extended rule is a variant of the original game, where a cell's neighborhood is extended to 2. (i.e. All other 24 cells in a square of size are now neighbors of the centering cell).
- Please note that it should be implemented as
class LifeRuleExtended.Hint
- This can be done by overriding
GetNeighbors.
Weighted Rule
The weighted life rule is a variant of our extended game. Now the living cells are all weighted, meaning that some neighbors might have greater influence.
First, let's define the total influence of a cell. This shows how much influence a cell receives from its neighbors in all. In our rules, each neighbor's weight relative to can be represented as the matrix below:
Then, knowing every neighbor's weight () and state (, dead for 0 and live for 1), the total influence () of a cell can be computed with the equation:
So in detail, what you should do is:
- For a cell, calculate the sum of the weights of its neighbors. We call this total influence.
- Underpopulation: Any cells with a total influence dies.
- Survive: Any living cell with total influence survives.
- Overpopulation: Any cells with a total influence dies.
- Reborn: Any dead cell with total influence becomes alive.
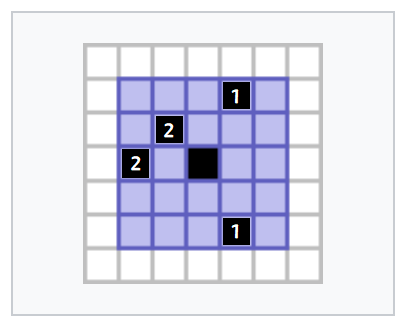
For example, the cell in the center of the following grid has a total influence of 6, so it will survive in the next generation.
Hint
This can be done by overriding
DetermineNextStateinLifeRuleExtended.
Generations Rule
The generations rule is a variant of the original game. Now the living cells will not die immediately when overpopulation or underpopulation happens. Instead, the cells 'get older' before the final death.
The detailed rules are as follows:
- A cell in state 0 ("dead") will switch to state 1 ("born") in the next state if it has exactly 3 neighbors that is not in state 0 ("dead").
- A cell in state 1 ("alive") will:
- Remain in state 1 ("survive") in the next state if it has 2 or 3 neighbors not in state 0 ("dead").
- Otherwise, switch to state 2 ("aging") in the next state.
- A cell in state will switch to state in the next state. In particular, a cell in state will be reset to state 0 ("die"). Which means that the state of a cell should always be in the range and can never be .
In this homework, .
- Please note that it should be implemented as
class LifeRuleGenerations.Hint
You may want to inherit
LifeRuleBaseand override itsDetermineNextState.
Cell state and map representation
Cell State
The cell class
LifeCellis defined inLifeCell.cpp. It has three attributes: x, y and state. However, to support different rules, the state is not binary (just 'dead' or 'alive'), but an integer state. The state of a cell can be one of the following:
- 0: dead
- 1: alive
- 2: red (colorised rule)
- 3: blue (colorised rule)
Or the state can be the generation of the cell in generations rule, in which case it can be any integer from 0 to 7.
Your implementation of the rules should be able to handle the state transition within the range, it is guaranteed in all test cases that:
- The state of a cell will never be negative.
- In the base rules, extended rules and weighted rules, the state of a cell will only be 0 or 1.
- In the colorised rule, the state of a cell will only be 0, 2 or 3.
- In the generations rule, the state of a cell will only be integers from 0 to 7.
Map File
Our game world can be represented by a map file. In our homework, we use a simple
.cellsfile to store the initial state of the game.We provide some example files in the
mapfolder, you can refer to How-to-Run to see how to load the map file.You don't need to load the map by yourself, our framework have already implemented the map loading function. In case you want to edit the map file, here is a brief introduction of the file format:
The file format is similar to plain text format for simpilicity. However, to support different rules, we have made some changes to the file format.
Notice (This part can be ignored if you don't want to edit the map file)
- Comments start with a '!' and are ignored
- Cells are represented by a 'O' or '.' (alive or dead respectively)
- 'R' and 'B' represent red and blue cells in colorised rule (it is ignored in other rules, and not supported officially by golly).
- Numbers represent the generation of the cell in generations rule (it is ignored in other rules, and not supported officially by golly).
How to run
Compile the project
In Windows, you can compile with:
In Linux or MacOS, you can compile with:
The framework we provide does not compile right off-hand, because the four classes of life rules for you to write haven't inherited from
LifeRuleBaseyet. Try to make these classes inherit fromLifeRuleBase, and you can compile your code to run the already implemented base game.
Run the project
The program takes one argument, which is the rule you want to use. The rule can be
Base,Colorised,Extended,Weighted,Generations.Try to run with
./gol baseand you can play with the original Game of Life.Then, you can select a map from
map/and play with it. We have provided different maps for different rules.For example, after you have implemented
LifeRuleColorised, you can run with./gol colorised, then load the map 'map/colorised.cells'.You can find more maps at the wiki and play with them at golly.
File Structure
This problem contains several files. You may need to read and understand some of them in order to complete the assignment. There are also some files that you can simply ignore. You don't need to understand every line to finish this homework.
Files you'll edit:
| Filename | Description |
|---|---|
LifeRule.h, LifeRule.cpp |
Where all of your rules will reside. You need to implement the rules in these files. You only need to submit these files. |
Files you might want to look at:
| Filename | Description |
|---|---|
LifeCell.h, LifeCell.cpp |
The cell class, representing a cell in a grid in the game world. |
GameWorld.h, GameWorld.cpp |
It contains the game world class, which maintains all the cells in the game world. |
main.cpp |
The main file that runs the game. This file defined a game instance and build up a interface. |
GameSettings.h |
The file that defines some basic game settings as described above. You may want to use these settings in your implementation. |
map/base.cells, map/colorised.cells... |
The map files for different rules. You can load them in the game. |
Supporting files you can ignore:
| Filename | Description |
|---|---|
utils.h |
Useful functions for implementing the interface. |
GameManager.cpp, GameManager.h |
Simple ASCII graphics for the game |
Submission
You need to pack LifeRule.h and LifeRule.cpp into a zip file and submit it to OJ.
The zip file can have an arbitrary name, but should only contain these two files. For MacOS users, it is fine to have one additional system-generated file named .DS_Store.
In Linux or MacOS, you can run the following command to pack the files:
1 | zip -r submit.zip LifeRule.h LifeRule.cpp |
In Windows, you can use 7-zip or BandiZip to pack the files, or use the following command:
1 | tar.exe -a -c -f submit.zip LifeRule.h LifeRule.cpp |
Appendix: How to work around with multiple files in C++
If you are not familiar with terminal, please refer to Learn how to use terminal.
It is hard to maintain a large project within a single file. Splitting your program into multiple small files makes it easier to understand and work with. Each file can focus on one specific task. This is less overwhelming than putting everything in one huge file.
In this homework, you will practice how to write multiple files and how to use them together.
In previous homeworks, you have written C++ programs in a single source file ( *.c, *.cpp ). Some homework contain header files ( *.h, *.hpp ), which are included in source files and not passed directly to the compiling command. Recall that, to compile a single-file C++ program, we run:
1 | g++ homework.cpp -o homework -Wall -Wextra |
g++ is the GNU C++ compiler. The -Wall and -Wextra flags enable additional warning messages to catch issues in your code. homework.cpp is the file you are compiling. The -o flag specifies the name of the executable file, homework in this case,
To compile multiple .cpp files into a program, you can run with:
1 | g++ circle.cpp square.cpp triangle.cpp -o shapes |
This will compile circle.cpp, square.cpp and triangle.cpp into into an executable named shapes. If there are header files such as circle.h or square.h, as long as they are properly included, the code in them are also compiled.
When compiling multiple files, make sure to:
- Include the proper header files in each
.cppfile, for example:
1 |
- Use include guards in your header files to avoid duplicate definitions, for example:
1 | // square.h |
- Declare functions in header files before implementing them in source files:
1 | // square.h |
- Use relative or absolute paths to include headers
1 |
